FAQs
Just in case you have any questions outside these FAQs then feel free to send us an email to [email protected].

SEOKart is an all-in-one DIY SEO app that can help you with optimizing your store for Google.
Using its advanced features like SEO Audit, Image Optimizer, Bulk Optimizer, Rich Snippets, etc, you can optimize your store with the best practices of SEO, and get better rankings on Google.
You can also track the rankings on multiple keywords.
The SEOKart app is built by professionals having 15+ years of experience in the field of SEO. The app works on the basics of SEO and does not try to 'overdo' anything.
With the right mix of features like rich snippets, image optimization, and bulk optimization, we offer an advanced SEO Audit that checks every product and category page of your store on the 15 most important SEO Factors.
All the changes will be permanent and will remain in your store even after you uninstall our app.
Please note that the script for the Rich Snippets put by our app will be removed on the uninstallation of our app.
As you are using our app inside BigCommerce/Shopify platform, some anti-virus Google Chrome plugins may show an alert or intervene in the functionality of our app.
In this scenario, please raise a ticket by sending an email to [email protected] and we will take care of that.
Start optimizing your categories and best seller products with our advanced SEO Audit. Try to get a score over 90 by following the 15 different issues mentioned there.
You can also optimize the images using the Image Optimizer feature and turn Rich Snippets On to get a better conversion rate.
You should start with identifying the right keywords. If you sell Leather Shoes in the USA, then your keywords can be "Buy Leather Shoes", "Leather Shoes Online" etc.
You should have different keywords for your home page, categories, and product pages.
Once you identify the keywords, start writing the Title Tag, Meta Description, and Products/Category descriptions including the keyword(s). Our app can help you do that with its advanced features.
That's not a good idea. If you still want to do it, use our Bulk Optimizer, and start updating the Title Tag and Meta Descriptions of all the products which don't have them.
You don't need to optimize hundreds of products in a month.
Even if you optimize as little as 50 products every month, then also you can expect a boost in store traction and revenue.
SEO Audit helps you in evaluating Google's (and other search engines') critical ranking factors and in highlighting and fixing the store optimization issues in the following easy steps:

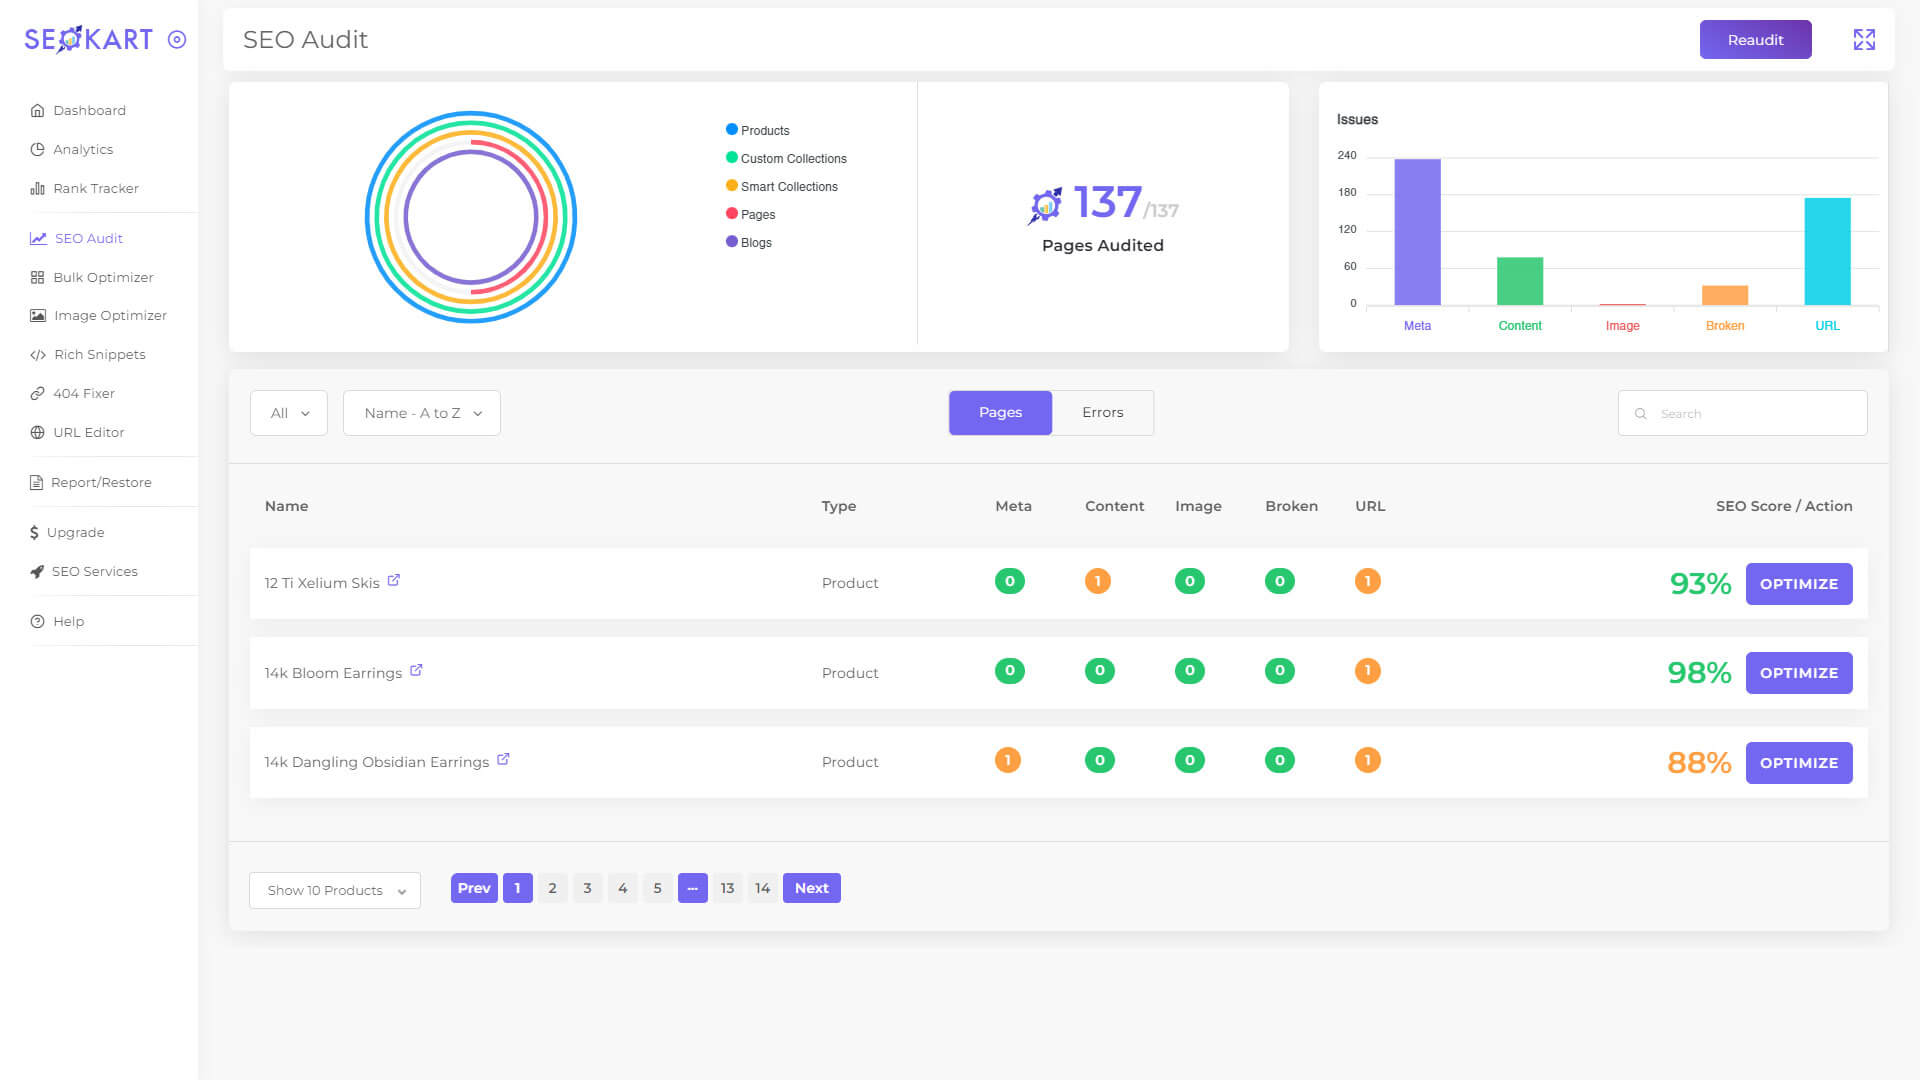
Finding the right Keyword for your page is the most important thing in achieving the top ranking in search results. For best rankings, it is recommended that you do deep research about your target customers, and marketplace to find the most accurate keywords.
The app also provides you with relevant suggestions for the right keywords for your page by mentioning the related word(s) in the Keyword field, as shown in the image.
For example, since we are working on the “dust pan” product page in our example image, the right Keyword would be “dust pan for sale” or “buy dust pan online”.
(You can also add the Keyword by clicking on the “+” sign next to the "Keyword" for tracking your store ranking on that particular keyword)
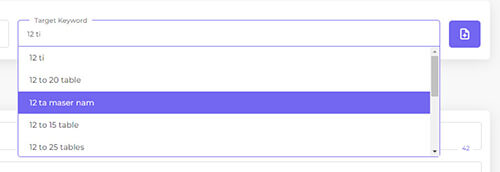
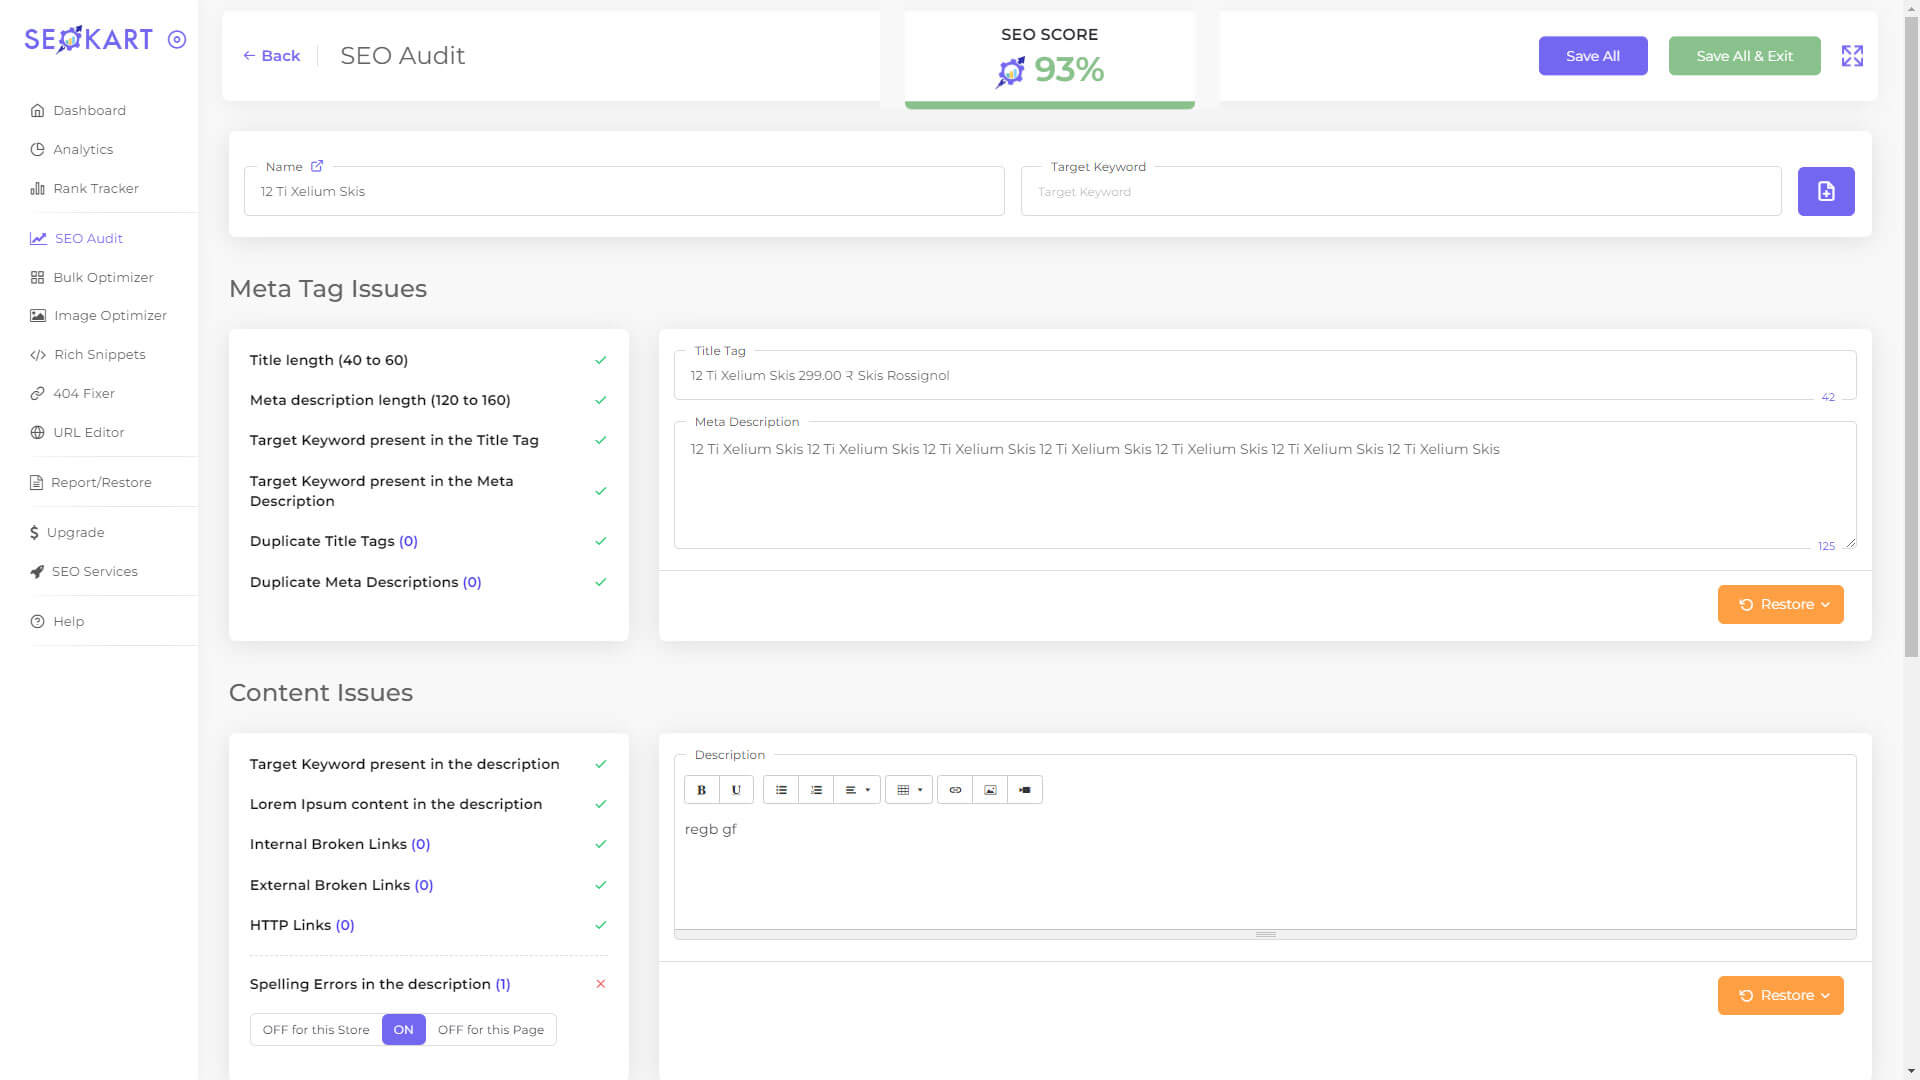
After selecting the Keyword, check your existing Title Tag if it has the keyword included in it as it is or not. If not, then edit the Title Tag so that it includes the keyword selected by you.
As you edit the Title Tag as per the keyword, keep in concern that its length should be between 40 - 60 characters count including space as specified on the left side of the page.
Hover to the Meta Description section on a single audit page. Edit your existing Meta Description so that it includes the target Keyword as it is and the Meta Description length should be between 120 - 160 characters including spaces.
Scroll to the description field and edit it in a way to include the target Keyword as it is.
Check for the primary image issues whether the Alt text is present or not. For images without ALT text, you can change, and update those images from the Image Issues section. You can add the ALT text from this section. By clicking on “OPTIMIZE” you may update it overall to decrease the size of the image and update the file name as per the Image Optimizer settings.
Scroll to the URL field and you will be able to find the errors with the URL. You can edit the URL and redirect the older one to the new URL of your choice.
After updating all the criteria correctly, you will find the green tick next to all the factors under issues. Any factors showing a red cross must be updated. Also, you would see an instant upgrade in your SEO score.
Simply repeat the process to optimize all the pages under your free/paid plan, one by one.
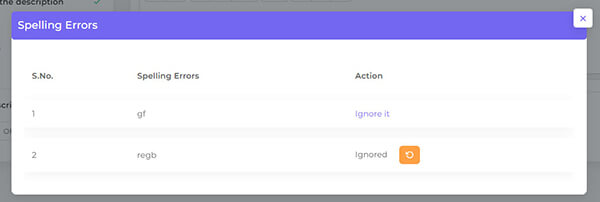
If you think the Spelling Errors are acceptable, the SEO Audit feature provides you with the access to turn off the spelling error factor which can be restricted to a single page or can be implemented on the complete store.
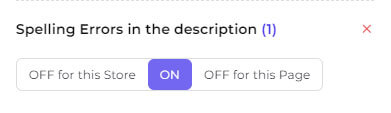
You can also ignore the spelling errors from the description, by clicking on the numerical value in front of spelling errors.
Next, you will be required to click on 'Ignore it' to remove that particular word from errors. You can also undo and restore the changes made to ignore the spelling error as well. SEOKart supports 11 languages for evaluating spellings.
The SEO Audit feature not only optimizes your SEO score but also gives you the freedom to reverse the changes up to the past 2 updates done by you. If you find that the changes made by you are not helping you to enhance your SEO or you did any change mistakingly, you may reverse and restore the original criteria for the page.
Steps:
You can fix the issues by targeting the required pages with errors.
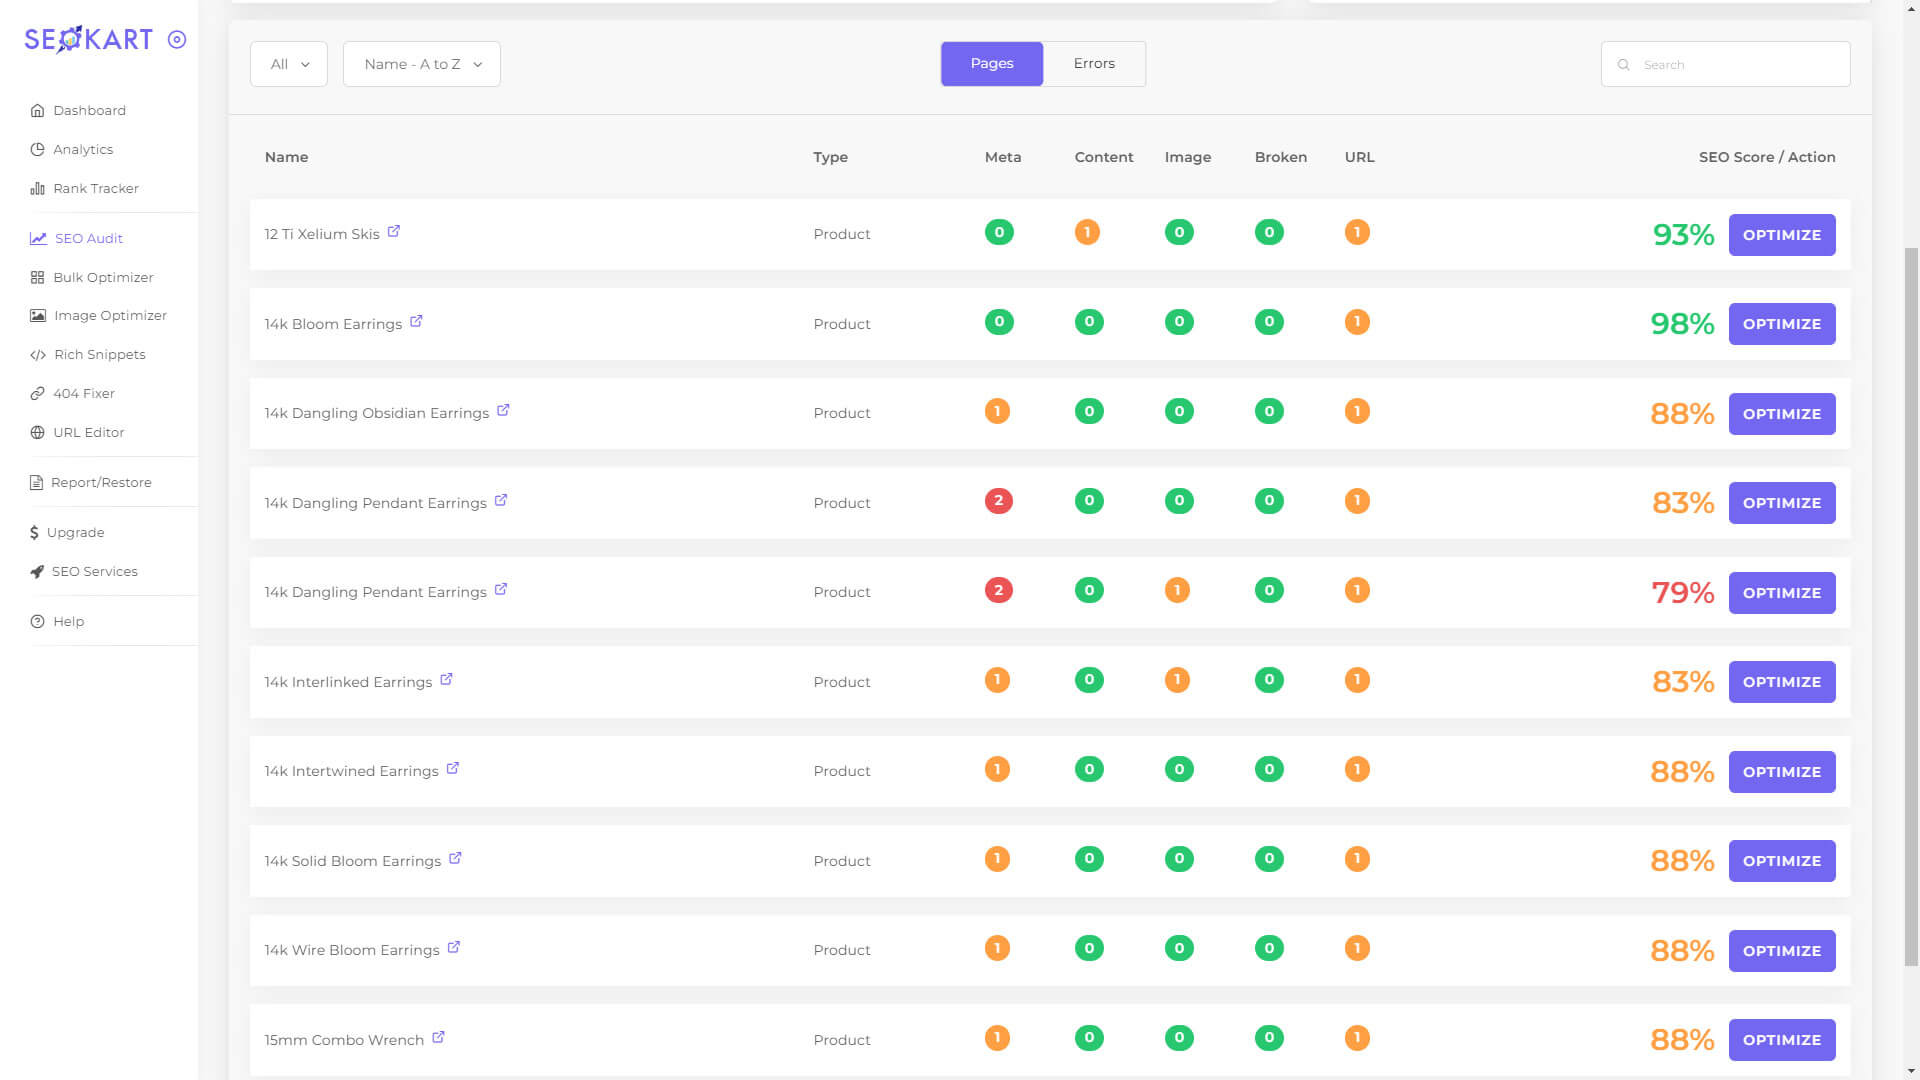
Your SEO score will upgrade instantly as soon as you update all the required factors as per the Google ranking metrics.
An SEO score above 90% is considered good enough to enhance your Google ranking.
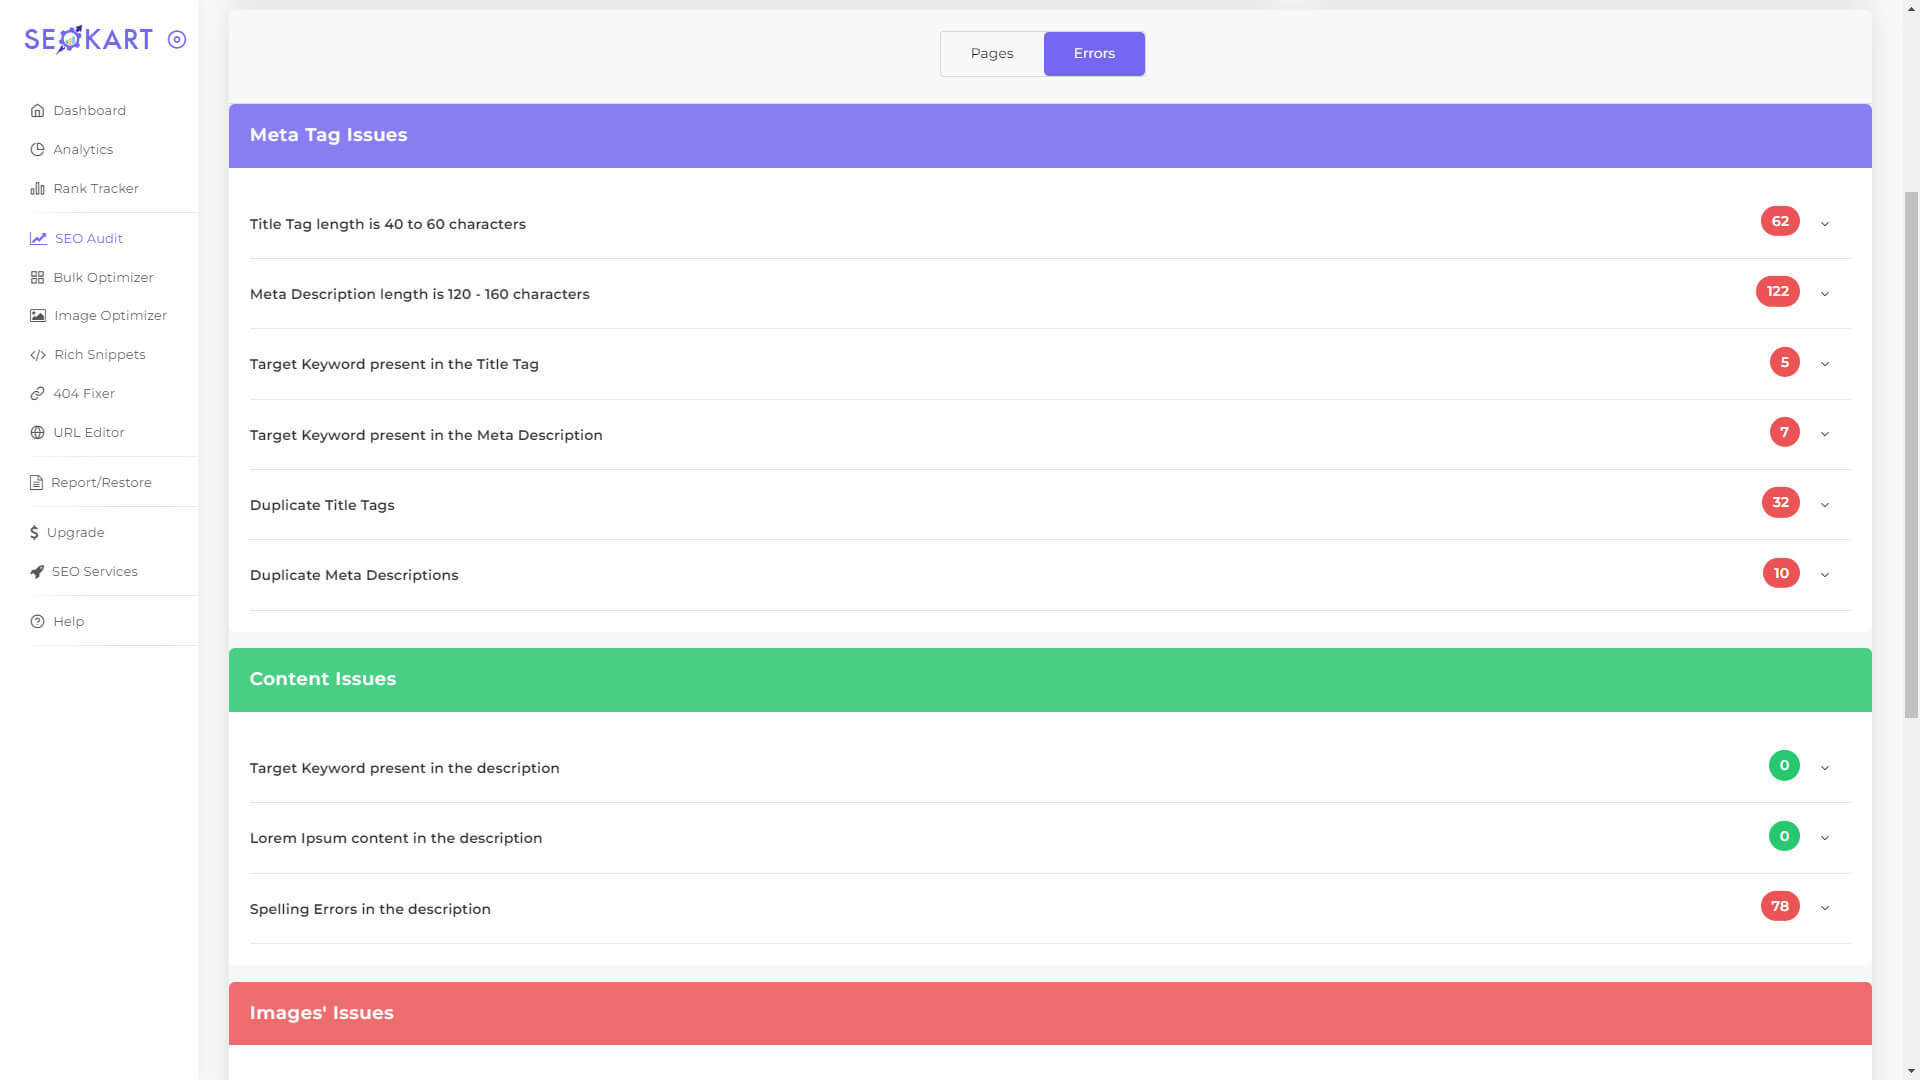
Under the Meta Tag issues section, you will find the option to resolve any Duplicate Title Tags or Duplicate Meta Descriptions issues, by clicking on the numerical value in the bracket.
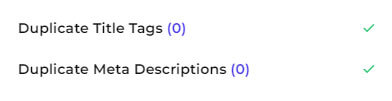
This will open a dialog box from where you can edit and fix the error(s).
SEOKart audits all the changes in the store pages automatically if they are done inside SEOKart. If you are not sure whether the changes made outside SEOKart synched in or not, you can click Sync on the top right of the SEO Audit page.
It will, then, complete the automatic synchronization of the updates done on those pages which are not updated on SEOKart. The Sync feature is included in the paid plan only.
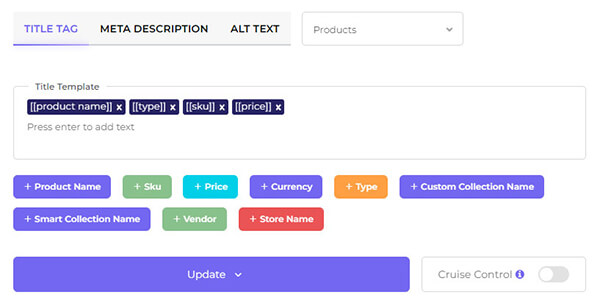
Bulk Optimizer is an outstanding feature of SEOKart to bulk update the Title Tags, Meta Description, and Alt text of store pages in a few easy steps as mentioned below:
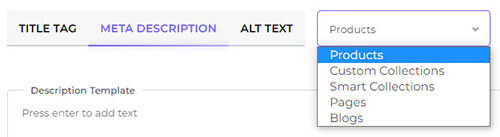
Our Bulk Optimizer feature enables you to update all those pages of your store which have got blank Title Tags.
Our bulk optimizer feature enables you to update all the pages of your store with blank Meta Descriptions.
The Bulk Optimizer feature fixes all the issues related to the missing Alt text in primary images on product pages.
You may easily review the update done by you via Bulk Optimizer.
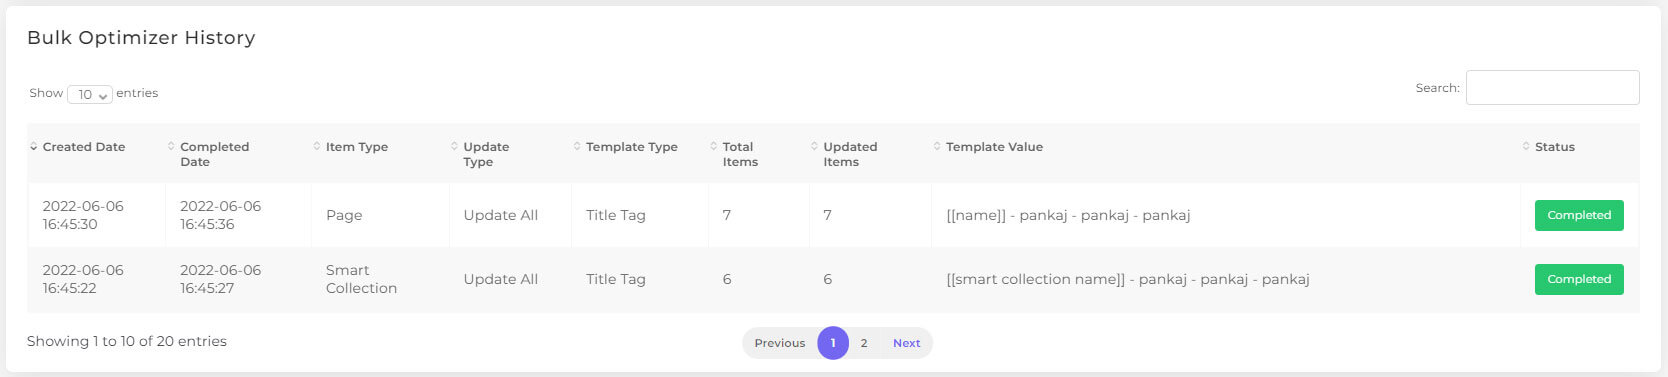
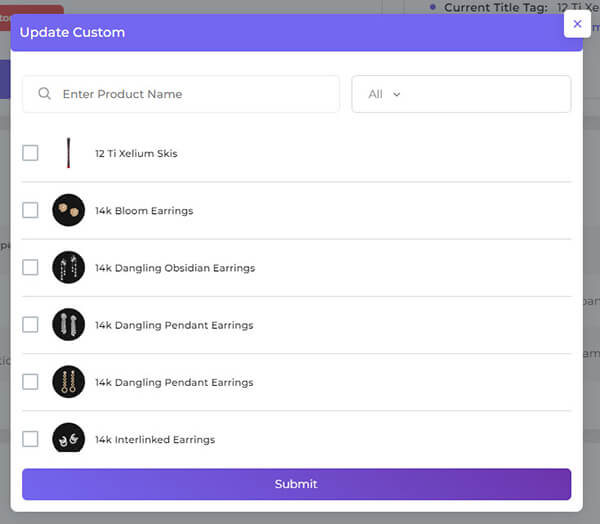
Bulk Optimizer has the option to customize the pages which you want to update.
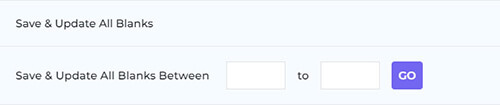
You do not need to update the newly added page through Bulk Optimizer. You are just required to turn On the “Cruise Control” option provided on the Bulk Optimizer page. It will automatically update the blank Title Tag, Meta Description, and Alt Text to the primary image as per the Template set by you, for the recently added page on your store. In Cruise Control History, you can also view the pages updated by Bulk Optimizer automatically.
The maximum character count limit for Title Tag and Meta Description is 225 characters including spaces. Also, keep the character length for Title Tags and Meta Description as recommended in our SEO Audit tool, to meet the standards of the Google algorithm for ranking.
You can update 100 pages of your store with Bulk Optimizer under the free plan. Under the paid plan, you can update unlimited pages of your store.
It may take some time to update all the pages depending upon the number of pages. You may leave the page and process other important tasks meanwhile the update is in progress.
The image Optimizer feature enables you the platform to optimize the images of your product pages.
Fill the Alt Text fields for the required products and then click “Save Alt Text”. All the updates would be implemented on the Alt. Texts.
Click the "Restore" button to reverse all the changes done by you in the images via the Image Optimizer feature. You can find the "Restore" button next to Optimize button. You can restore the original images within 3 days of the update only.
You can optimize up to 200 images via Image Optimizer in our free plan. In the paid plan, you can optimize unlimited images from your store pages.
Once the image is optimized, click on "Preview" button, and you will be able to find the option to preview the changes as shown below.
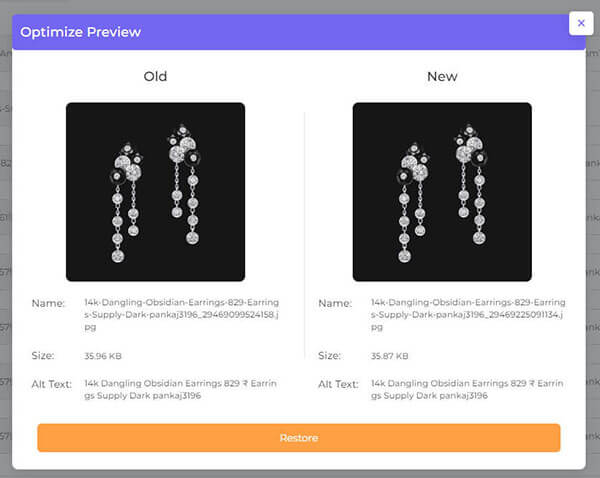
You can see the changes as per the image quality, File Name, File Size, and Alt Text.
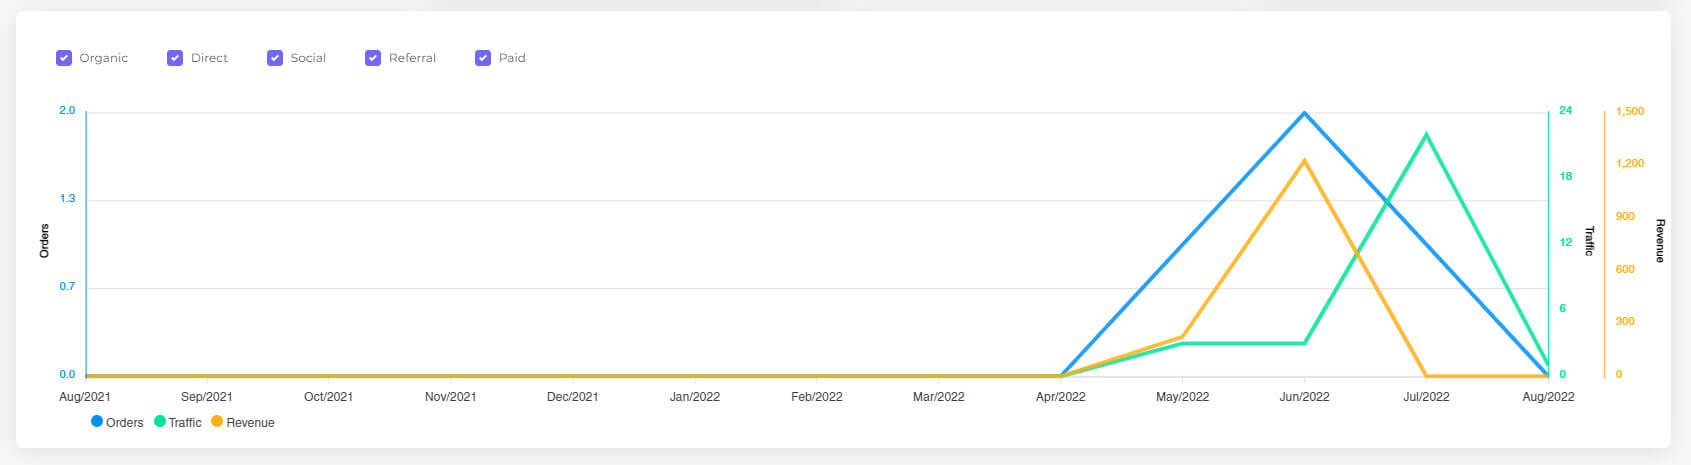
The analytics feature links the store to Google Analytics and provides the exact measures of the traffic, orders, and revenue over the website.
Analytics display the website traffic, revenue, orders, and conversion rate as shown in the image provided below:
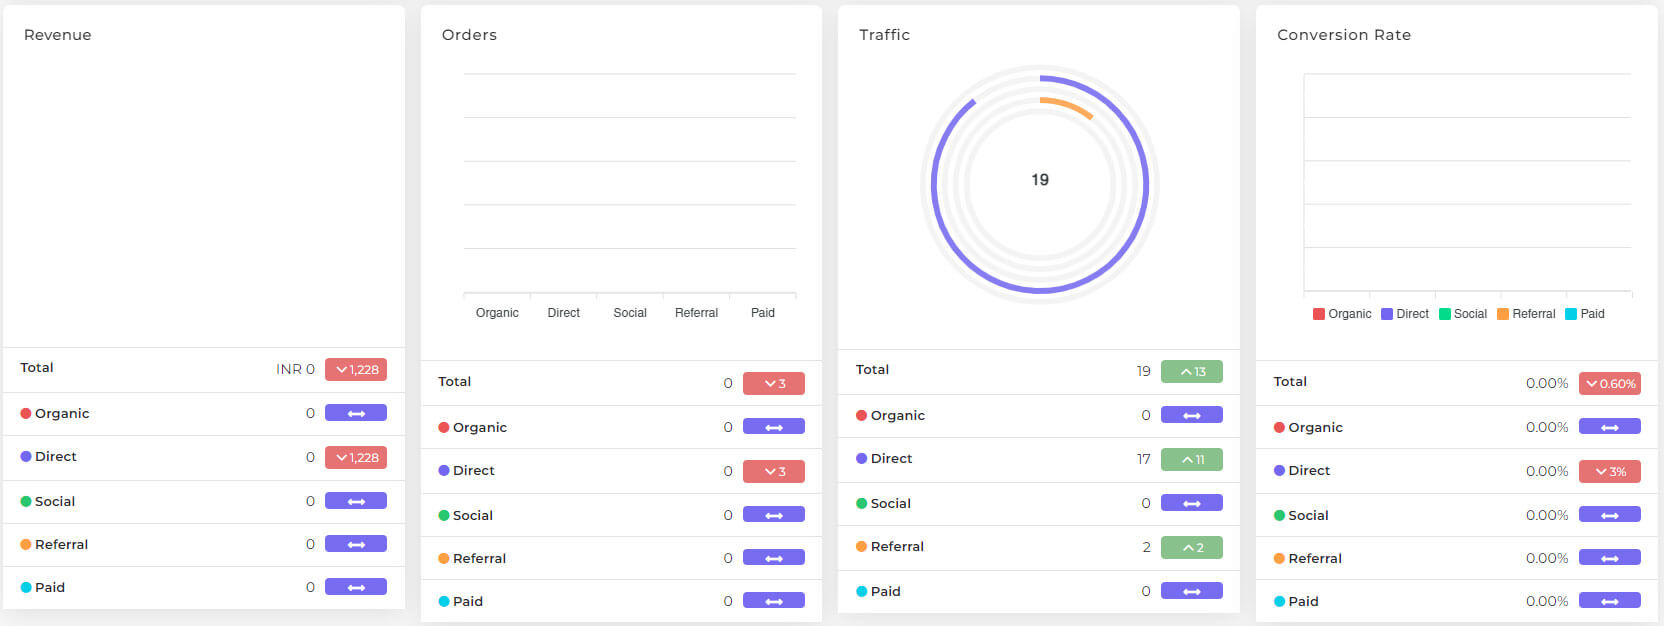
You can also check the website performance for specific time window.
Also, you will get a graphical representation of the web traffic, revenue, and orders for 13 months, as shown in the example image:
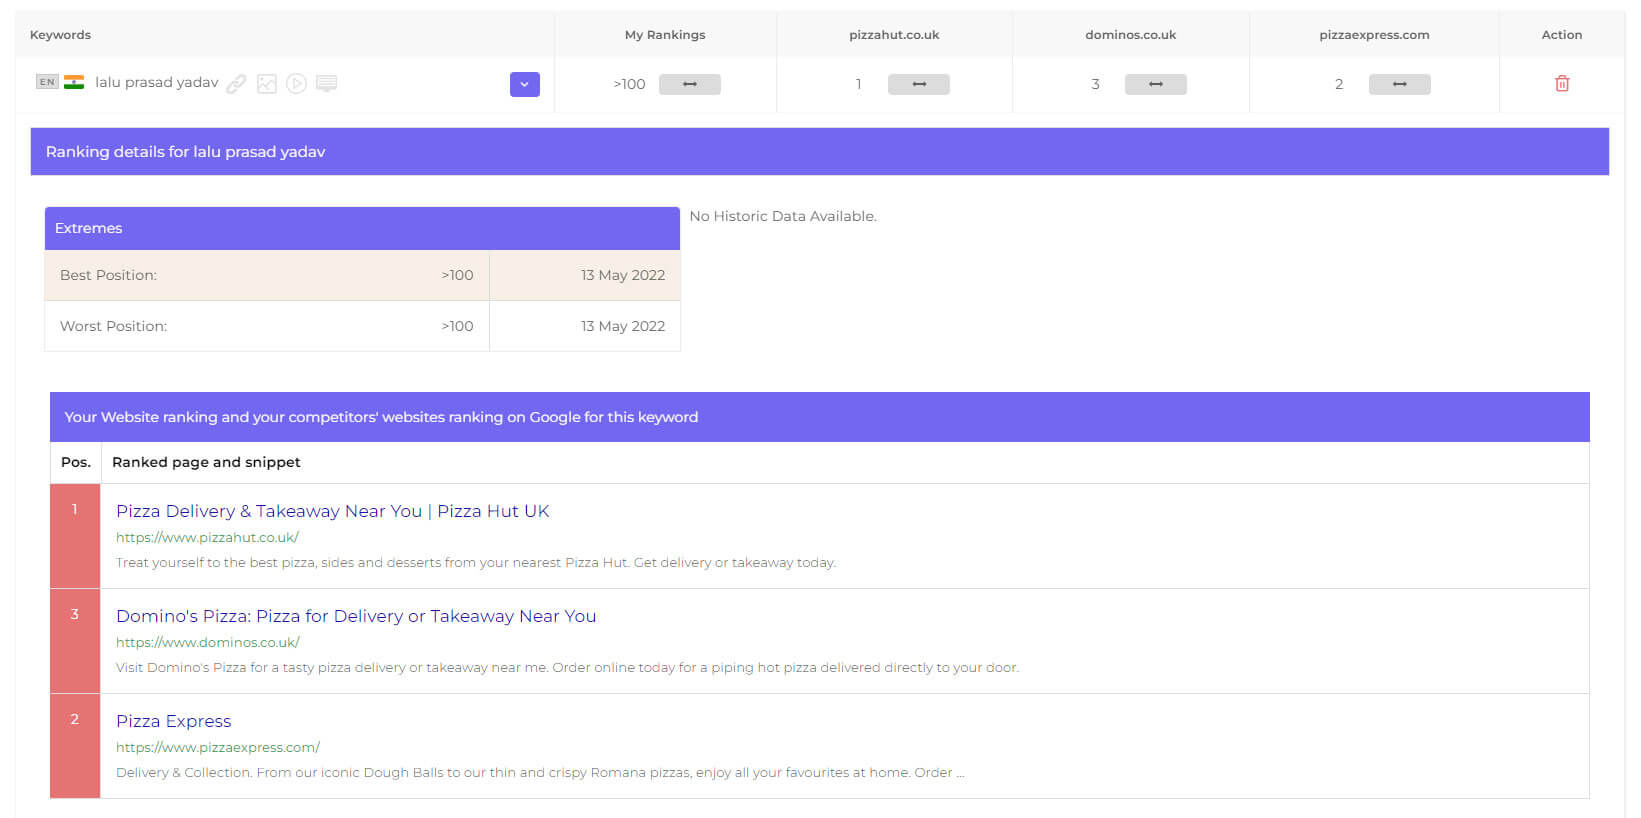
The ranking feature is provided to search for the appropriate Keywords for the store pages and add Keywords to track the weekly or monthly ranking of website accordingly.

The Ranking feature provides you with a detailed analysis of your previous and latest ranking after adding the keywords.
You can add 25 keywords for Keyword Rank Tracking in our free plan. The charges for adding more keywords depend upon the number of keywords you want to add and can be checked in detail in the “Upgrade” section of the SEOKart app.
The keywords suggestions are generated automatically based on the trend of the popularity of your website. If your domain is new, you may not be getting any suggestions and you may be required to wait unless your domain gets old.
Rich Snippets are the features of your store pages you want to be highlighted in your website's listing on Google, along with the Meta tags, such as product reviews, price, or rating. Our Rich Snippets feature enables you to check the eligibility of your website pages to apply the rich snippets as per the Google testing tool and to apply the rich snippets on the required pages.
A:
A:
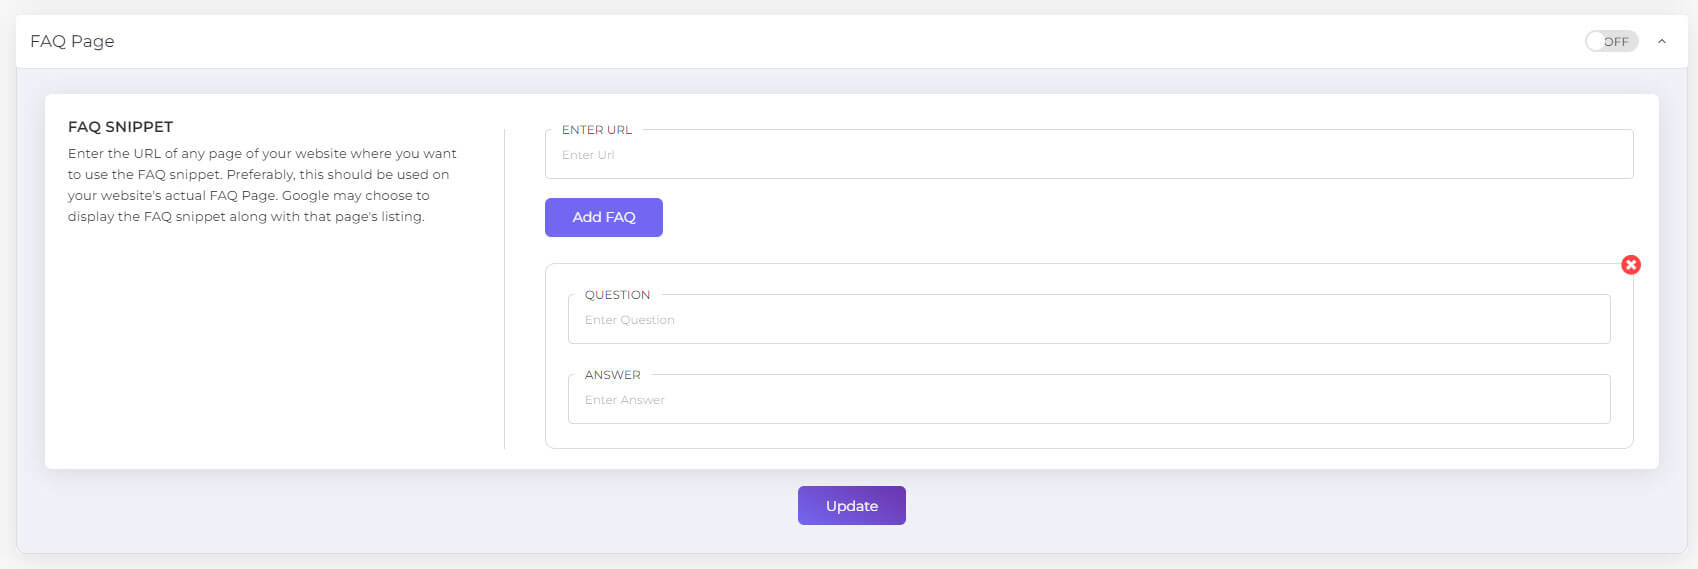
Rich Snippets feature enables you to add snippets to the FAQ page. You can also add the FAQ snippet to any of the website pages, where you want it to be represented.
The 404 Error feature helps you to review all your website pages with broken links and to fix the issues by redirecting the URL to the new link.
The URL Editor feature works to fix all the issues related to the URL. The issues are:
To update the URL:
You can edit as many URLs of your store in the URL Editor feature.
The Report/Restore feature works to provide you a report of the overall performance of your store including SEO Audit, Keyword Ranking and Google Analytics.
In the Report/Restore feature of SEOKart, you get the option to restore the changes done in Name, Title Tags, Meta Description, Description and URL for up to the past 2 updates. You also get the Table Fields to select the criteria you want to restore as well as you can download reports for the required criteria or pages.
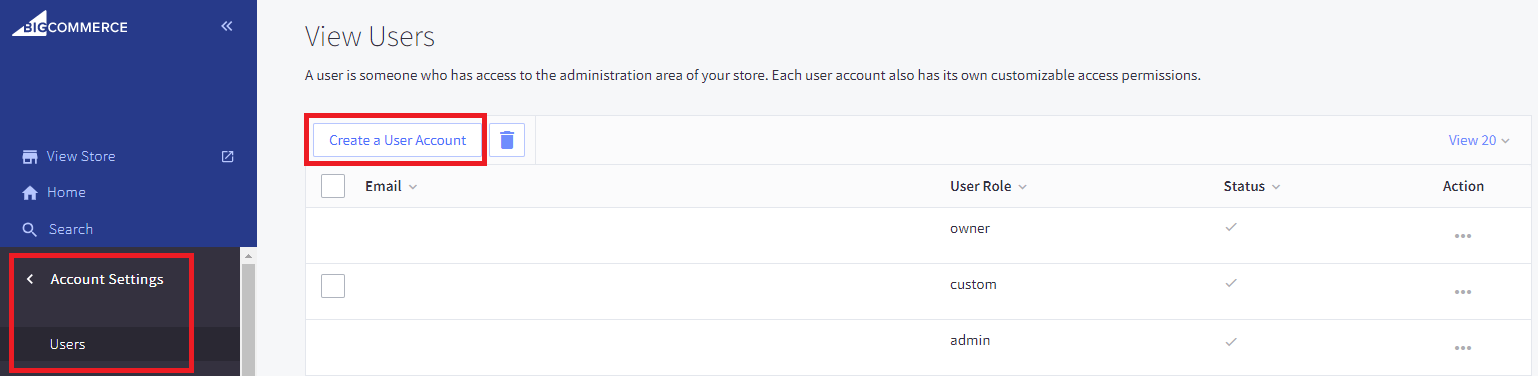
Please follow the below steps to share the BigCommerce Access
1. Login to BigCommerce with Admin Account
2. Go to Account Settings › Users and click Create a User Account
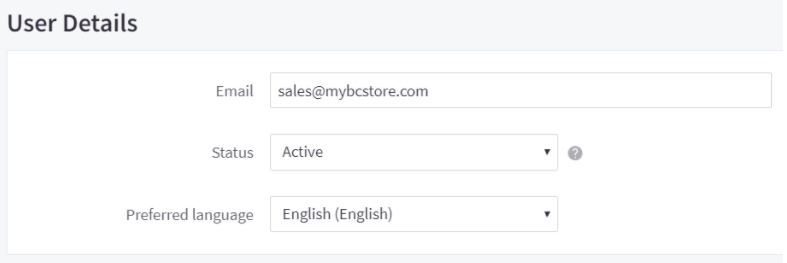
3. Enter the new user's email address as [email protected] and set their status, and select their preferred control panel language or select the default language on the user's browser.
4. Select User Role as Store Administrator with Full Permissions.

5. In the Apps Section, select SEOKart
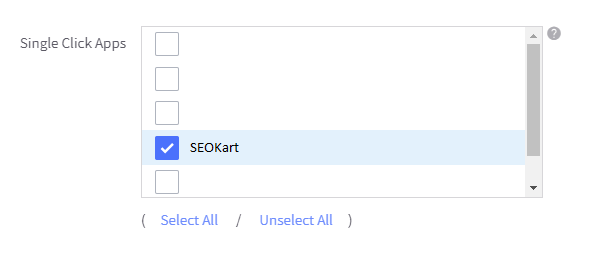
6. Click upon Save.
Please follow the steps below to provide SEOKart with Shopify access:
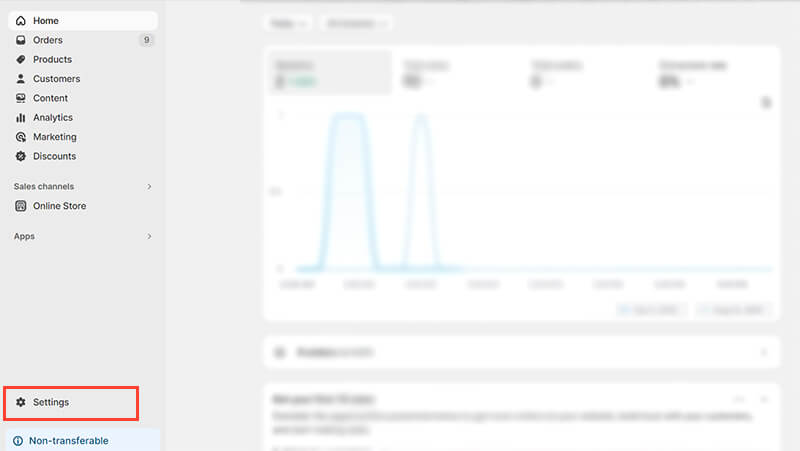
1. Go to your Shopify admin account and click 'Settings' in the bottom left corner.
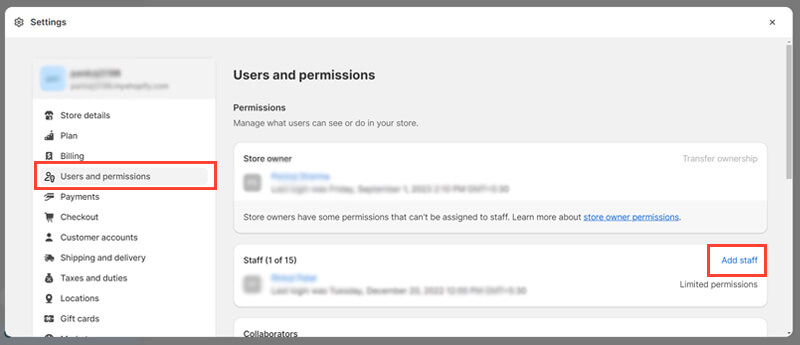
2. On the left menu bar, click 'users and permissions' to access its detailed view. On the detailed screen of 'Users and permissions,' navigate to 'Staff' > 'Add staff.'
Clicking the 'Add staff' button will open the 'Add staff' screen.
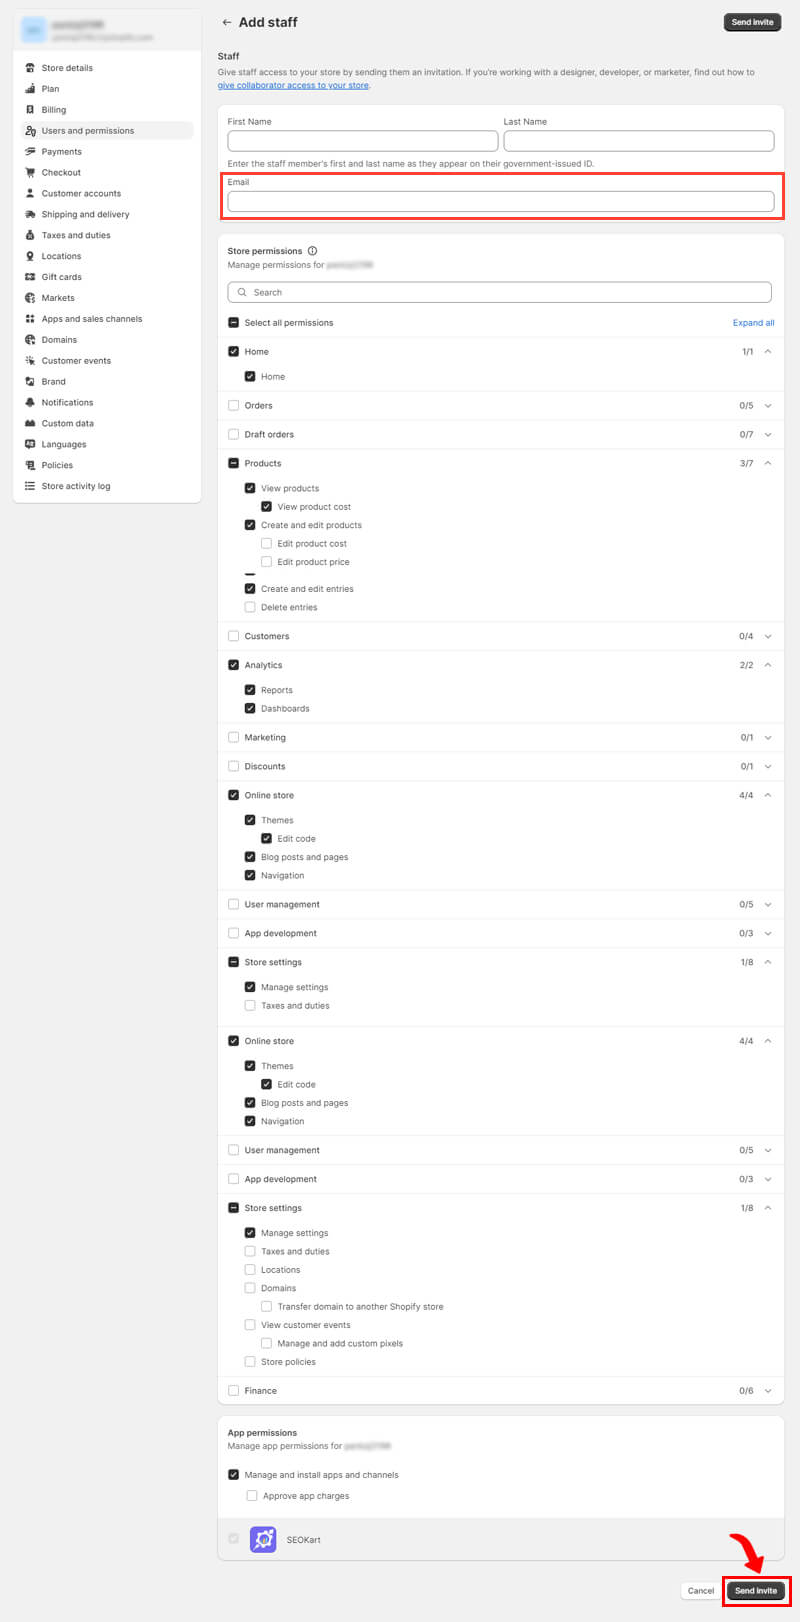
3. On the 'Add staff' screen, paste [email protected] into the 'Email' box and individually select the permissions as shown in the screenshot below.
Finally, make sure to click the 'Send Invite' button in the lower right corner.
Please follow the below steps to share the Google Analytics Access
1. Sign in to Google Analytics. https://analytics.google.com/
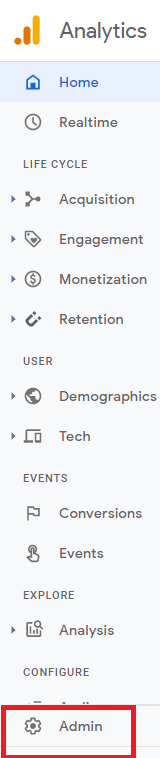
2. Click Admin, and navigate to the desired account/property/view.
3. In the Account column, click Account User Management.
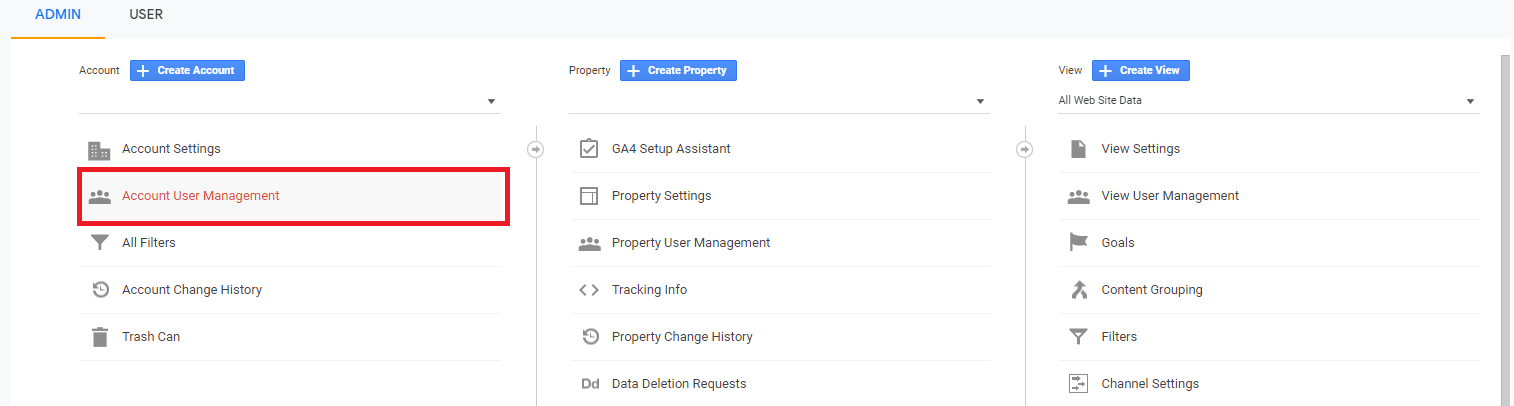
4. In the Account permissions list, click +, then click Add users.

5. Enter the email address [email protected] for the user's Google Account. Select full permissions & Notify new users by email.
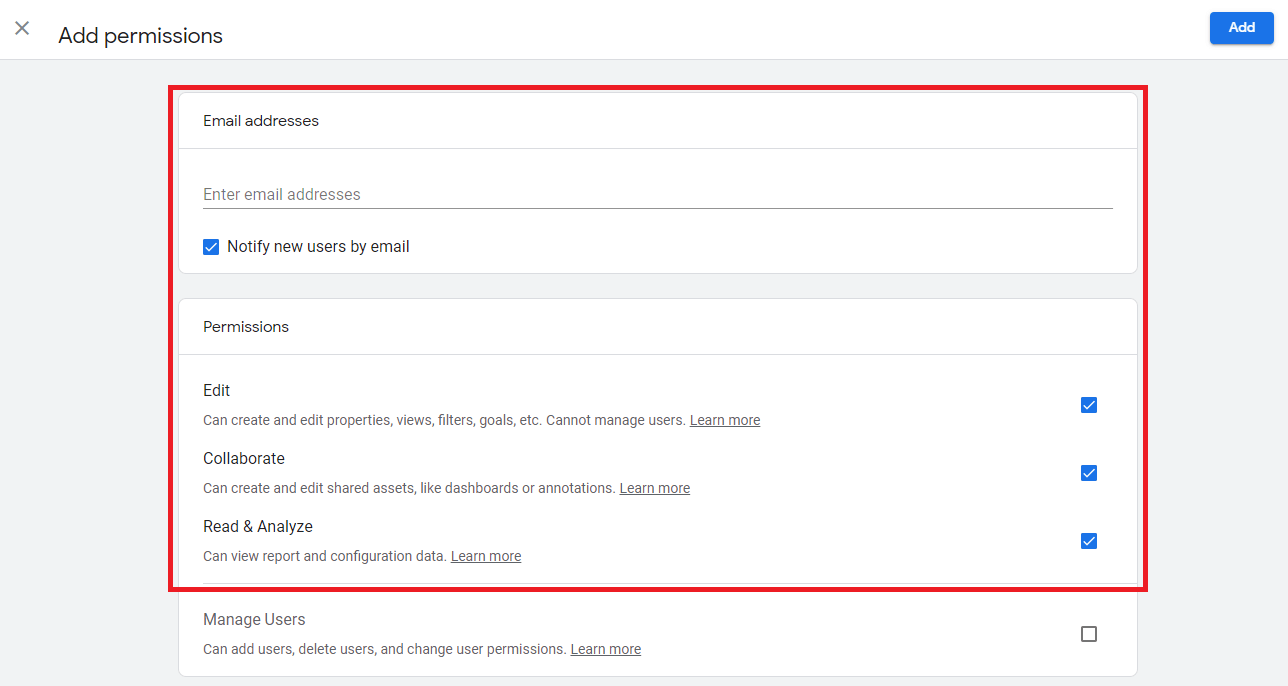
6. Click Add.

Please follow the below steps to share the Google Search Console Access
1. Sign into Google Search Console Account https://search.google.com/search-console/welcome
2. Select the correct property from the “search property” drop down.
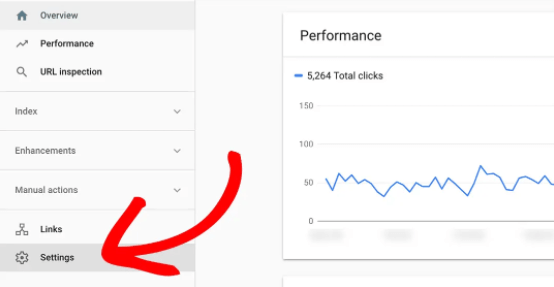
3. Select the settings.
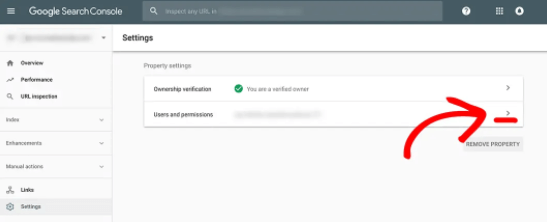
4. Under settings select users and permissions.
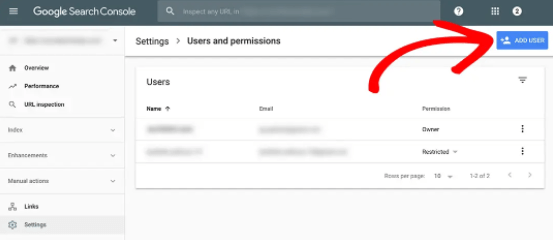
5. In the Users and permissions settings select Add User.
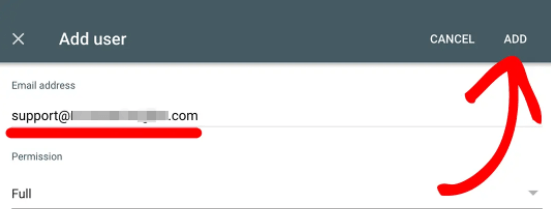
6. On the Add user screen, add the email [email protected] with full permissions, and click add.